# MANUAL
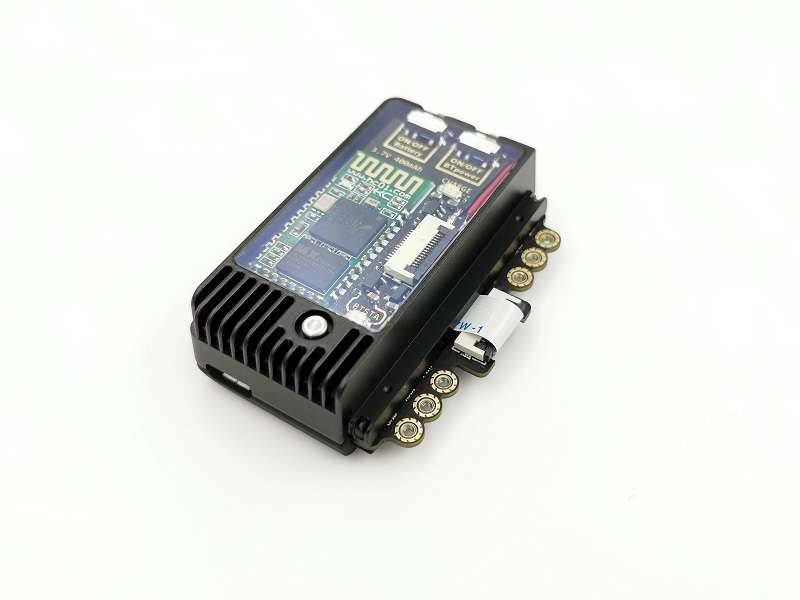
### Bluetooth / Battery add-on 'Blue Shark'
_rev. v1.0 (draft)_
### 1. FEATURES
* Built-in Bluetooth 2.0 with EDR Bluetooth module, default baud rate 115200.
* Built-in 400 mAh polymer lithium-ion battery, typical standby time up to 3.5 hours.
* Additional heat dissipating fins can significantly reduce the temperature when the HF antenna is in operation for a long time.
* Complete lithium charging management system, seamless switching power supply. Full overcharge and overdischarge protection.
* Bluetooth has an independent power switch that can be turned on or off.
* It's compact and easy to carry. The clamp structure is easy to install and replace.
It can easily connect to Bluetooth mobile phone, portable computer, etc. Without USB cable, complicated permissions or driver settings.
Built-in battery can support standalone mode, off-line sniffing, off-line reading & simulation, etc. The temperature of the device is stable.
### 2. PARAMETERS
* Battery capacity: 400 mAh
* Standby time: 3.5h @ StandBy; 2.9h @ LF-On; 50min @ HF-On;
* Charging Current: 200mA (Plug in USB Default Charging)
* Charging time: 2.5h
* Num of charges: 400 -> 70% capacity (standard LIPO)
* Bluetooth power: 4dBm, -85 dBm @ 2Mbps
* Bluetooth distance: 6m (depending on the environment and device orientation)
* Size and weight: 54.4mm * 29.4mm * 13.5mm 24g
### 3. ASSEMBLY STEPS
* Unplug your Proxmark3 RDV4.0 device from any usb cable.
* Remove the plastic upper case of Proxmark3 RDV4.0 with opener.
* Remove temporarily the antenna with a H5 (Hex/Allen) screwdriver to expose the FPC interface.
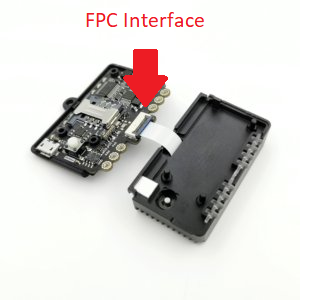
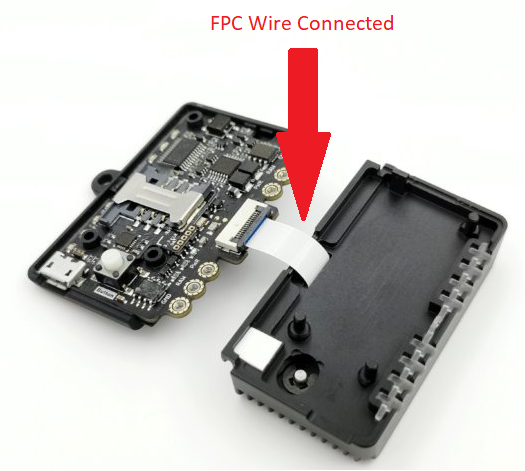
* Turn off all power switches, insert the FPC wire into the FPC connector, and lock the FPC connector.
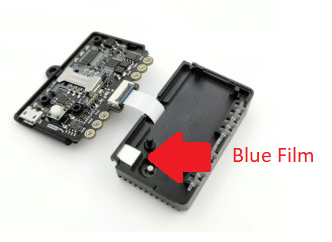
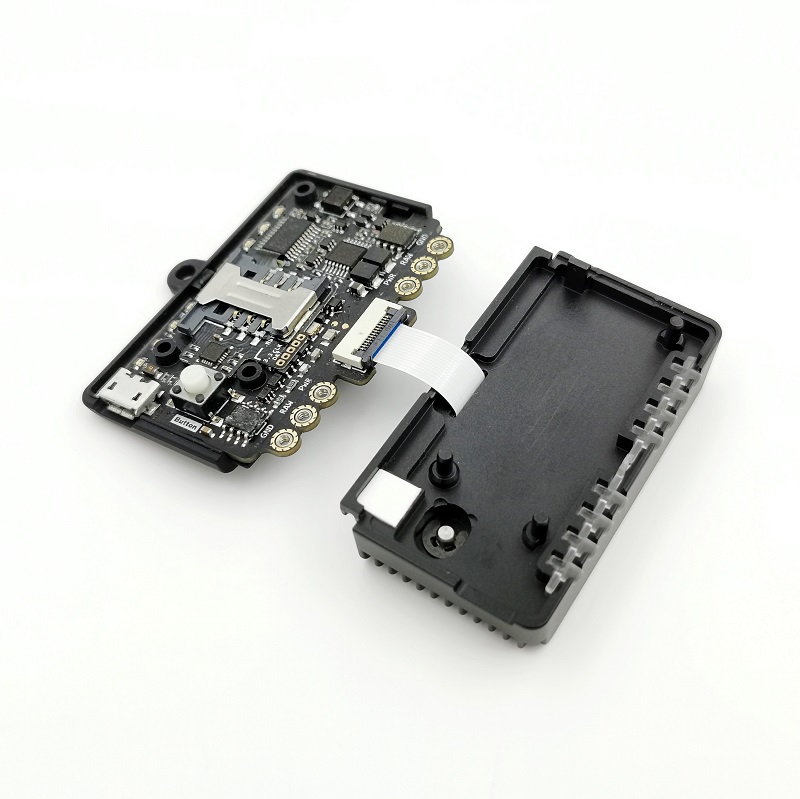
* Tear off the blue film of heat conductive double-sided tape. Align the add-on to the hole positions and gently insert it into the case.
* Assembly finished!
### 4. COMPILATION / FLASHING
#### From Source
Please download the latest source code from Rfid Research Group's Github repo:
https://github.com/RfidResearchGroup/proxmark3
To compile the client and firmware with FPC support, the easiest way is to
1. Copy the sample file: `Makefile.platform.sample` ⇒ `Makefile.platform`
2. Edit `Makefile.platform`, uncomment the line `#PLATFORM_EXTRAS=BTADDON` by removing the `#`
3. Recompile the project:
* `make clean; make -j8`
4. Flash the firmware
You are now ready to run the client with the serial port you got from your BT device on your laptop etc.
See instructions below.
#### Homebrew (macOS)
From the [homebrew-proxmark3 readme](https://github.com/RfidResearchGroup/homebrew-proxmark3)
1. `brew tap rfidresearchgroup/proxmark3`
2. `brew install --with-blueshark proxmark3`
### 5. CONNECT WITH BLUETOOTH
You can have both USB cable connect and BT active at the same time and connect to either serial port.
You can also switch serial port from inside the proxmark3 client using the new command `hw connect`.
### Default settings
1. Serial: `115200 8N1`
2. Name: `PM3_RDV4.0`
3. Pin: `1234`
#### Windows
#### (1) Connecting your RDV4.0 with Bluetooth on mobile phone or computer
* Open Bluetooth and search for a device named PM3_RDV4.0.
* Enter the paired password 1234 and establish the connection.
* The blue state LED on the add-on will keep blinking after the connection is established. Only when the mobile phone or computer opens the correct COM port, the blue LED turns on solid, indicating that the connection is successful.
#### (2) Fast connection using dedicated USB Bluetooth adapter under Windows
* Install driver:
http://www.silabs.com/products/development-tools/software/usb-to-uart-bridge-vcp-drivers
* Insert the adapter into the USB port. The adapter will search automatically and establish the connection. The adapter will remember the device that was first connected and after that the same device will be connected.
* The adapter button can be used to delete memory so that other add-on can be searched and connected.
 * After the connection is established, the blue state LED on add-on will turn on solid.
* look for _CP2104 USB tp UART bridge controller_ under devices in order to get the assigned serial port
#### Linux
#### (1) Connecting rdv4.0 with Bluetooth on Linux computer
1. Find the MAC address of the Bluetooth add-on, named PM3_RDV4.0.
```sh
sudo hcitool scan
Scanning ...
aa:bb:cc:dd:ee:ff PM3_RDV4.0
```
Instead of `aa:bb:cc:dd:ee:ff`, you'll see your MAC address.
2. Bind your BT add-on MAC address to a serial port
```sh
sudo rfcomm bind rfcomm0 aa:bb:cc:dd:ee:ff
```
Replace `aa:bb:cc:dd:ee:ff` by your MAC address.
3. The blue state LED on the add-on will keep blinking after the
connection is established. Only when the Proxmark3 client opens the
`/dev/rfcomm0` port, the blue LED turns on solid, indicating that the
connection is successful.
4. Use Proxmark client on BT-serial port
```sh
./proxmark3 /dev/rfcomm0
```
The first time, your OS will ask you for pairing. The default PIN is
1234. If PIN is not typed in quickly, the client might timeout. Simply
restart it again after pairing.
If your OS doesn't prompt you for pairing, you can do it in command line, e.g. (again, replace with your addon MAC address):
```sh
bluetoothctl
[bluetooth]# pairable on
[bluetooth]# scan on
Discovery started
...
[CHG] Device aa:bb:cc:dd:ee:ff Name: PM3_RDV4.0
[bluetooth]# trust aa:bb:cc:dd:ee:ff
[bluetooth]# pair aa:bb:cc:dd:ee:ff
[agent] Enter PIN code: 1234
[bluetooth]# quit
```
#### (2) Fast connection using dedicated USB Bluetooth adapter under Linux
* After the connection is established, the blue state LED on add-on will turn on solid.
* look for _CP2104 USB tp UART bridge controller_ under devices in order to get the assigned serial port
#### Linux
#### (1) Connecting rdv4.0 with Bluetooth on Linux computer
1. Find the MAC address of the Bluetooth add-on, named PM3_RDV4.0.
```sh
sudo hcitool scan
Scanning ...
aa:bb:cc:dd:ee:ff PM3_RDV4.0
```
Instead of `aa:bb:cc:dd:ee:ff`, you'll see your MAC address.
2. Bind your BT add-on MAC address to a serial port
```sh
sudo rfcomm bind rfcomm0 aa:bb:cc:dd:ee:ff
```
Replace `aa:bb:cc:dd:ee:ff` by your MAC address.
3. The blue state LED on the add-on will keep blinking after the
connection is established. Only when the Proxmark3 client opens the
`/dev/rfcomm0` port, the blue LED turns on solid, indicating that the
connection is successful.
4. Use Proxmark client on BT-serial port
```sh
./proxmark3 /dev/rfcomm0
```
The first time, your OS will ask you for pairing. The default PIN is
1234. If PIN is not typed in quickly, the client might timeout. Simply
restart it again after pairing.
If your OS doesn't prompt you for pairing, you can do it in command line, e.g. (again, replace with your addon MAC address):
```sh
bluetoothctl
[bluetooth]# pairable on
[bluetooth]# scan on
Discovery started
...
[CHG] Device aa:bb:cc:dd:ee:ff Name: PM3_RDV4.0
[bluetooth]# trust aa:bb:cc:dd:ee:ff
[bluetooth]# pair aa:bb:cc:dd:ee:ff
[agent] Enter PIN code: 1234
[bluetooth]# quit
```
#### (2) Fast connection using dedicated USB Bluetooth adapter under Linux
1. Insert the adapter into the USB port. The adapter will search
automatically and establish the connection. The adapter will remember
the device that was first connected and after that the same device will
be connected.
2. The adapter button can be used to delete memory so that other add-on
can be searched and connected.
3. After the connection is established, the blue state LED on add-on will
turn on solid.
4. a serial port `/dev/ttyUSB0` will be created, use Proxmark3 client on it
```sh
./proxmark3 /dev/ttyUSB0
```
#### MacOS
#### (1) Connecting rdv4.0 with Bluetooth on MacOS
With MacOS Mojave 10.14.5 you could experience some continuosly disconnecting and difficult to recconnect the device at the system wakeup, to avoid this problem do a PRAM reset before to add your Proxmark3 RDV4 Blue Shark:
1. Open a Terminal and execute this command: sudo rm -R /Library/Preferences/com.apple.Bluetooth.plist.
2. Shut down your Mac.
3. Then turn it on and immediately press and hold these four keys together: Option, Command, P, and R.
4. You can release the keys after about 20 seconds, during which your Mac might appear to restart.
After reboot you can go ahead to pairing your Proxmark3 RDV4 Blue Shark:
5. Make sure the Blue Shark BT switch is turned ON
6. On your Mac, choose Apple menu -> System Preferences, then click Bluetooth.
7. Select the device in the list, then click Connect and add the 1234 pwd.
8. A serial port like `/dev/tty.PM3_RDV40-DevB` will be created, use Proxmark3 client on it
```sh
./proxmark3 /dev/tty.PM3_RDV40-DevB
```
#### Android
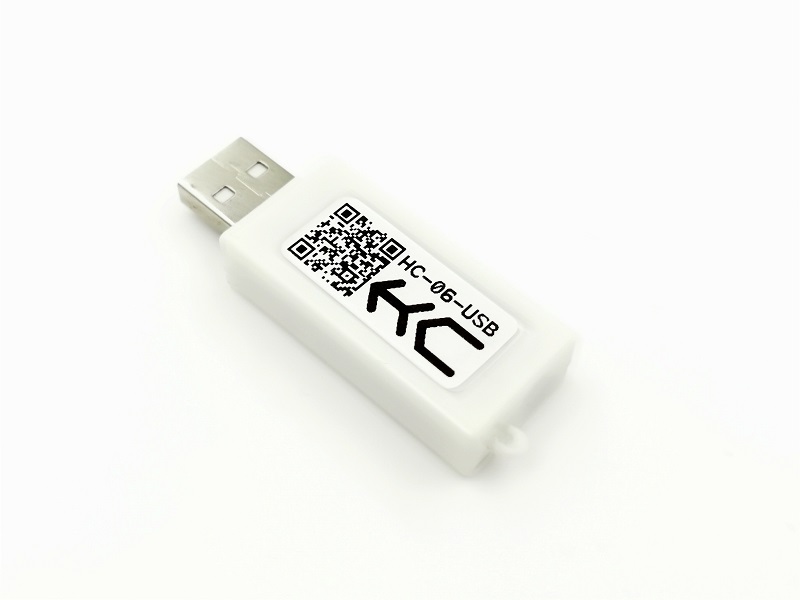
#### (2) Fast connection using dedicated Bluetooth (HC-06 Master + CP2102) adapter under Android with Termux
1. Make sure you already followed this tutorial https://github.com/RfidResearchGroup/proxmark3/blob/master/doc/termux_notes.md#setup and have Termux with an running Proxmark3 client ready. You need additional the `cp210x` serial usb driver enabled and working, like the `USB_ACM` driver to communicate wireless.
2. Insert the Bluetooth adapter with an fitting USB-C/Micro-USB converter into your Android USB port and a serial port `/dev/ttyUSB0` will be created. To see if it's working, run `tsudo ls /dev/ttyU*` and it should list `/dev/ttyUSB0`.
3. The adapter will search automatically and establish the connection to BlueShark. The adapter will remember the device that was first connected and after that the same device will be connected. After the connection is established, the blue state LED on add-on will turn on solid.
4. If you see this, congratulations, you can run your Proxmark3 client in Termux with `tsudo proxmark3/client/proxmark3 /dev/ttyUSB0`
##### Notes
If you bought your Bluetooth adapter somewhere else, make sure to set the baud rate to 115200 `AT+BAUD8` and PIN `AT+PIN1234` correctly
### 6. OTHER NOTES
#### (1) UART and LED behavior
Bluetooth is connected to Proxmark3 RDV4.0 via UART. The USB and UART interfaces of RDV4.0 can coexist without conflict, and no special switching is required.
The following link has helpful notes on UART usage and baud rates:
https://github.com/RfidResearchGroup/proxmark3/blob/master/doc/uart_notes.md
#### (2) Disassembly
There is a heat conductive double-sided tape inside the add-on, which has strong adhesive force. Therefore, if add-on needs to be removed, it needs to be pulled out from the heat sink end with greater efforts. Each disassembly will reduce the viscidity of double-sided tape. When double-sided tape is well protected, it will not affect the second use. Thermal conductivity will be slightly worse and will therefore have a direct impact on the thermal performance of the heat sink.
#### (3) Battery charging
The battery charging circuit is turned on by default. Any time a USB cable is inserted, the battery will be automatically charged. The red LED will remain bright when charging.
The red LED will be extinguished when charging is completed.
#### (4) Get better signals
For the better heat dissipation, we have used a cast metal enclosure for the add-on. As a result Bluetooth wireless signals are sacrificed. For example, if the back of add-on is facing the Bluetooth host, the signal is very bad and the distance will be reduced. The best signal strength can be obtained when the front glass faces the Bluetooth host.
If the Proxmark3 is not responding, it may be due to a poor Bluetooth connection. To improve performance, try repositioning the Proxmark3 so the glass face is directed toward the host.