| .github/workflows | ||
| configs | ||
| helm | ||
| integration-tests | ||
| sample | ||
| scripts | ||
| unit-tests | ||
| .editorconfig | ||
| .gitignore | ||
| alpine-versions.sh | ||
| build.sh | ||
| CODE_OF_CONDUCT.md | ||
| Dockerfile | ||
| GApps-SMTP-config.png | ||
| integration-test.sh | ||
| LICENSE | ||
| README.md | ||
| unit-tests.sh | ||
docker-postfix 

Simple postfix relay host ("postfix null client") for your Docker containers. Based on Alpine Linux.
Table of contents
- Table of contents
- Description
- TL;DR
- Configuration options
- Extending the image
- Security
- Quick how-tos
- Similar projects
- License check
Description
This image allows you to run POSTFIX internally inside your docker cloud/swarm installation to centralise outgoing email sending. The embedded postfix enables you to either send messages directly or relay them to your company's main server.
This is a server side POSTFIX image, geared towards emails that need to be sent from your applications. That's why this postfix configuration does not support username / password login or similar client-side security features.
IF YOU WANT TO SET UP AND MANAGE A POSTFIX INSTALLATION FOR END USERS, THIS IMAGE IS NOT FOR YOU. If you need it to manage your application's outgoing queue, read on.
TL;DR
To run the container, do the following:
docker run --rm --name postfix -e "ALLOWED_SENDER_DOMAINS=example.com" -p 1587:587 boky/postfix
You can now send emails by using localhost:1587 as your SMTP server address. Of course, if
you haven't configured your example.com domain to allow sending from this IP (see
openspf), your emails will most likely be regarded as spam.
All standard caveats of configuring the SMTP server apply:
- MAKE SURE YOUR OUTGOING PORT 25 IS NOT BLOCKED.
- Most ISPs block outgoing connections to port 25 and several companies (e.g. NoIP, Dynu offer workarounds).
- Hosting centers also tend to block port 25, which can be unblocked per requirst (e.g. for AWS either fill out a form or forward mail to their SES service, which is free for low volumes).
- You'll most likely need to at least set up SPF records or DKIM.
- If using DKIM (below), make sure to add DKIM keys to your domain's DNS entries.
- You'll most likely need to set up PTR records to prevent your mails going to spam.
If you don't know what any of the above means, get some help. Google is your friend. It's also worth noting that as a consequence it's pretty difficult to host a SMTP server on a dynamic IP address.
Please note that the image uses the submission (587) port by default. Port 25 is not exposed on purpose, as it's regularly blocked by ISP or already occupied by other services.
Configuration options
The following configuration options are available
General options
TZ= The timezone for the imageFORCE_COLOR= Set to1to force color output (otherwise auto-detected)INBOUND_DEBUGGING= Set to1to enable detailed debugging in the logsALLOWED_SENDER_DOMAINS= domains which are allowed to send email via this serverALLOW_EMPTY_SENDER_DOMAINS= if value is set (i.e:true),ALLOWED_SENDER_DOMAINScan be unsetLOG_FORMAT= Set your log format (JSON or plain)
Inbound debugging
Enable additional debugging for any connection coming from POSTFIX_mynetworks. Set to a non-empty string (usually 1
or yes) to enable debugging.
ALLOWED_SENDER_DOMAINS and ALLOW_EMPTY_SENDER_DOMAINS
Due to in-built spam protection in Postfix you will need to specify sender domains -- the domains you are using to send your emails from, otherwise Postfix will refuse to start.
Example:
docker run --rm --name postfix -e "ALLOWED_SENDER_DOMAINS=example.com example.org" -p 1587:587 boky/postfix
If you want to set the restrictions on the recipient and not on the sender (anyone can send mails but just to a single domain for instance),
set ALLOW_EMPTY_SENDER_DOMAINS to a non-empty value (e.g. true) and ALLOWED_SENDER_DOMAINS to an empty string. Then extend this image through custom scripts to configure Postfix further.
Log format
The image will by default output logs in human-readable (plain) format. If you are deploying the image to Kubernetes,
it might be worth chaging the output format to json as it's more easily parsable by tools such as
Prometheus.
To change the log format, set the (unsurprisingly named) variable LOG_FORMAT=json.
Postfix-specific options
RELAYHOST= Host that relays your messagesRELAYHOST_USERNAME= An (optional) username for the relay serverRELAYHOST_PASSWORD= An (optional) login password for the relay serverRELAYHOST_TLS_LEVEL= Relay host TLS connection leveMASQUERADED_DOMAINS= domains where you want to masquerade internal hostsSMTP_HEADER_CHECKS= Set to1to enable header checks of to a location of the file for header checksPOSTFIX_hostname= Set tha name of this postfix serverPOSTFIX_mynetworks= Allow sending mails only from specific networks ( default127.0.0.0/8,10.0.0.0/8,172.16.0.0/12,192.168.0.0/16)POSTFIX_message_size_limit= The maximum size of the messsage, in bytes, by default it's unlimitedPOSTFIX_<any_postfix_setting>= provide any additional postfix setting
RELAYHOST, RELAYHOST_USERNAME and RELAYHOST_PASSWORD
Postfix will try to deliver emails directly to the target server. If you are behind a firewall, or inside a corporation you will most likely have a dedicated outgoing mail server. By setting this option, you will instruct postfix to relay (hence the name) all incoming emails to the target server for actual delivery.
Example:
docker run --rm --name postfix -e RELAYHOST=192.168.115.215 -p 1587:587 boky/postfix
You may optionally specifiy a relay port, e.g.:
docker run --rm --name postfix -e RELAYHOST=192.168.115.215:587 -p 1587:587 boky/postfix
Or an IPv6 address, e.g.:
docker run --rm --name postfix -e 'RELAYHOST=[2001:db8::1]:587' -p 1587:587 boky/postfix
If your end server requires you to authenticate with username/password, add them also:
docker run --rm --name postfix -e RELAYHOST=mail.google.com -e RELAYHOST_USERNAME=hello@gmail.com -e RELAYHOST_PASSWORD=world -p 1587:587 boky/postfix
RELAYHOST_TLS_LEVEL
Define relay host TLS connection level. See smtp_tls_security_level for details. By default, the permissive level ("may") is used, which basically means "use TLS if available" and should be a sane default in most cases.
This level defines how the postfix will connect to your upstream server.
MASQUERADED_DOMAINS
If you don't want outbound mails to expose hostnames, you can use this variable to enable Postfix's
address masquerading. This can be used to do things
like rewrite lorem@ipsum.example.com to lorem@example.com.
Example:
docker run --rm --name postfix -e "ALLOWED_SENDER_DOMAINS=example.com example.org" -e "MASQUERADED_DOMAINS=example.com" -p 1587:587 boky/postfix
SMTP_HEADER_CHECKS
This image allows you to execute Postfix header checks. Header checks allow you to execute a certain action when a certain MIME header is found. For example, header checks can be used prevent attaching executable files to emails.
Header checks work by comparing each message header line to a pre-configured list of patterns. When a match is found the
corresponding action is executed. The default patterns that come with this image can be found in the smtp_header_checks
file. Feel free to override this file in any derived images or, alternately, provide your own in another directory.
Set SMTP_HEADER_CHECKS to type and location of the file to enable this feature. The sample file is uploaded into
/etc/postfix/smtp_header_checks in the image. As a convenience, setting SMTP_HEADER_CHECKS=1 will set this to
regexp:/etc/postfix/smtp_header_checks.
Example:
docker run --rm --name postfix -e "SMTP_HEADER_CHECKS="regexp:/etc/postfix/smtp_header_checks" -e "ALLOWED_SENDER_DOMAINS=example.com example.org" -p 1587:587 boky/postfix
POSTFIX_hostname
You may configure a specific hostname that the SMTP server will use to identify itself. If you don't do it,
the default Docker host name will be used. A lot of times, this will be just the container id (e.g. f73792d540a5)
which may make it difficult to track your emails in the log files. If you care about tracking at all,
I suggest you set this variable, e.g.:
docker run --rm --name postfix -e "POSTFIX_hostname=postfix-docker" -p 1587:587 boky/postfix
POSTFIX_mynetworks
This implementation is meant for private installations -- so that when you configure your services using docker compose you can just plug it in. Precisely because of this reason and the prevent any issues with this postfix being inadvertently exposed on the internet and then used for sending spam, the default networks are reserved for private IPv4 IPs only.
Most likely you won't need to change this. However, if you need to support IPv6 or strenghten the access further, you can override this setting.
Example:
docker run --rm --name postfix -e "POSTFIX_mynetworks=10.1.2.0/24" -p 1587:587 boky/postfix
POSTFIX_message_size_limit
Define the maximum size of the message, in bytes. See more in Postfix documentation.
By default, this limit is set to 0 (zero), which means unlimited. Why would you want to set this? Well, this is
especially useful in relation with RELAYHOST setting. If your relay host has a message limit (and usually it does),
set it also here. This will help you "fail fast" -- your message will be rejected at the time of sending instead having
it stuck in the outbound queue indefinitely.
Overriding specific postfix settings
Any Postfix configuration option can be overriden using POSTFIX_<name>
environment variables, e.g. POSTFIX_allow_mail_to_commands=alias,forward,include. Specifying no content (empty
variable) will remove that variable from postfix config.
DKIM / DomainKeys
This image is equipped with support for DKIM. If you want to use DKIM you will need to generate DKIM keys. These can be either generated automatically, or you can supply them yourself.
The DKIM supports the following options:
DKIM_SELECTOR= Override the default DKIM selector (by default "mail").DKIM_AUTOGENERATE= Set to non-empty value (e.g.trueor1) to have the server auto-generate domain keys.OPENDKIM_<any_dkim_setting>= Provide any additional OpenDKIM setting.
Supplying your own DKIM keys
If you want to use your own DKIM keys, you'll need to create a folder for every domain you want to send through. You
will need to generate they key(s) with the opendkim-genkey command, e.g.
mkdir -p /host/keys; cd /host/keys

for DOMAIN in example.com example.org; do
    # Generate a key with selector "mail"
    opendkim-genkey -b 2048 -h rsa-sha256 -r -v --subdomains -s mail -d $DOMAIN
    # Fixes https://github.com/linode/docs/pull/620
    sed -i 's/h=rsa-sha256/h=sha256/' mail.txt
    # Move to proper file
    mv mail.private $DOMAIN.private
    mv mail.txt $DOMAIN.txt
done
...
opendkim-genkey is usually in your favourite distribution provided by installing opendkim-tools or opendkim-utils.
Add the created <domain>.txt files to your DNS records. Afterwards, just mount /etc/opendkim/keys into your image
and DKIM will be used automatically, e.g.:
docker run --rm --name postfix -e "ALLOWED_SENDER_DOMAINS=example.com example.org" -v /host/keys:/etc/opendkim/keys -p 1587:587 boky/postfix
Auto-generating the DKIM selectors through the image
If you set the environment variable DKIM_AUTOGENERATE to a non-empty value (e.g. true or 1) the image will
automatically generate the keys.
Be careful when using this option. If you don't bind /etc/opendkim/keys to a persistent volume, you will get new
keys every single time. You will need to take the generated public part of the key (the one in the .txt file) and
copy it over to your DNS server manually.
Changing the DKIM selector
mail is the default DKIM selector and should be sufficient for most usages. If you wish to override the selector,
set the environment variable DKIM_SELECTOR, e.g. ... -e DKIM_SELECTOR=postfix. Note that the same DKIM selector will
be applied to all found domains. To override a selector for a specific domain use the syntax
[<domain>=<selector>,...], e.g.:
DKIM_SELECTOR=foo,example.org=postfix,example.com=blah
This means:
- use
postfixforexample.orgdomain - use
blahforexample.comdomain - use
fooif no domain matches
Overriding specific OpenDKIM settings
Any OpenDKIM configuration option can be overriden using OPENDKIM_<name>
environment variables, e.g. OPENDKIM_RequireSafeKeys=yes. Specifying no content (empty variable) will remove that
variable from OpenDKIM config.
Verifying your DKIM setup
I strongly suggest using a service such as dkimvalidator to make sure your keys are set up properly and your DNS server is serving them with the correct records.
Extending the image
Using custom init scripts
If you need to add custom configuration to postfix or have it do something outside of the scope of this configuration,
simply add your scripts to /docker-init.db/: All files with the .sh extension will be executed automatically at the
end of the startup script.
E.g.: create a custom Dockerfile like this:
FROM boky/postfix
LABEL maintainer="Jack Sparrow <jack.sparrow@theblackpearl.example.com>"
ADD Dockerfiles/additional-config.sh /docker-init.db/
Build it with docker, and your script will be automatically executed before Postfix starts.
Or -- alternately -- bind this folder in your docker config and put your scripts there. Useful if you need to add a config to your postfix server or override configs created by the script.
For example, your script could contain something like this:
#!/bin/sh
postconf -e "address_verify_negative_cache=yes"
Security
Postfix will run the master proces as root, because that's how it's designed. Subprocesses will run under the postfix
account which will use UID:GID of 100:101. opendkim will run under account 102:103.
Quick how-tos
Relaying messages through your Gmail account
Please note that Gmail does not support using your password with non-OAuth2 clients, which -- technically -- postfix is. You will need to enable Less secure apps in your account and assign an "app password". You'll also need to use (only) your email as the sender address.
Your configuration would be as follows:
RELAYHOST=smtp.gmail.com:587
RELAYHOST_USERNAME=you@gmail.com
RELAYHOST_PASSWORD=your-gmail-app-password
ALLOWED_SENDER_DOMAINS=gmail.com
There's no need to configure DKIM or SPF, as Gmail will add these headers automatically.
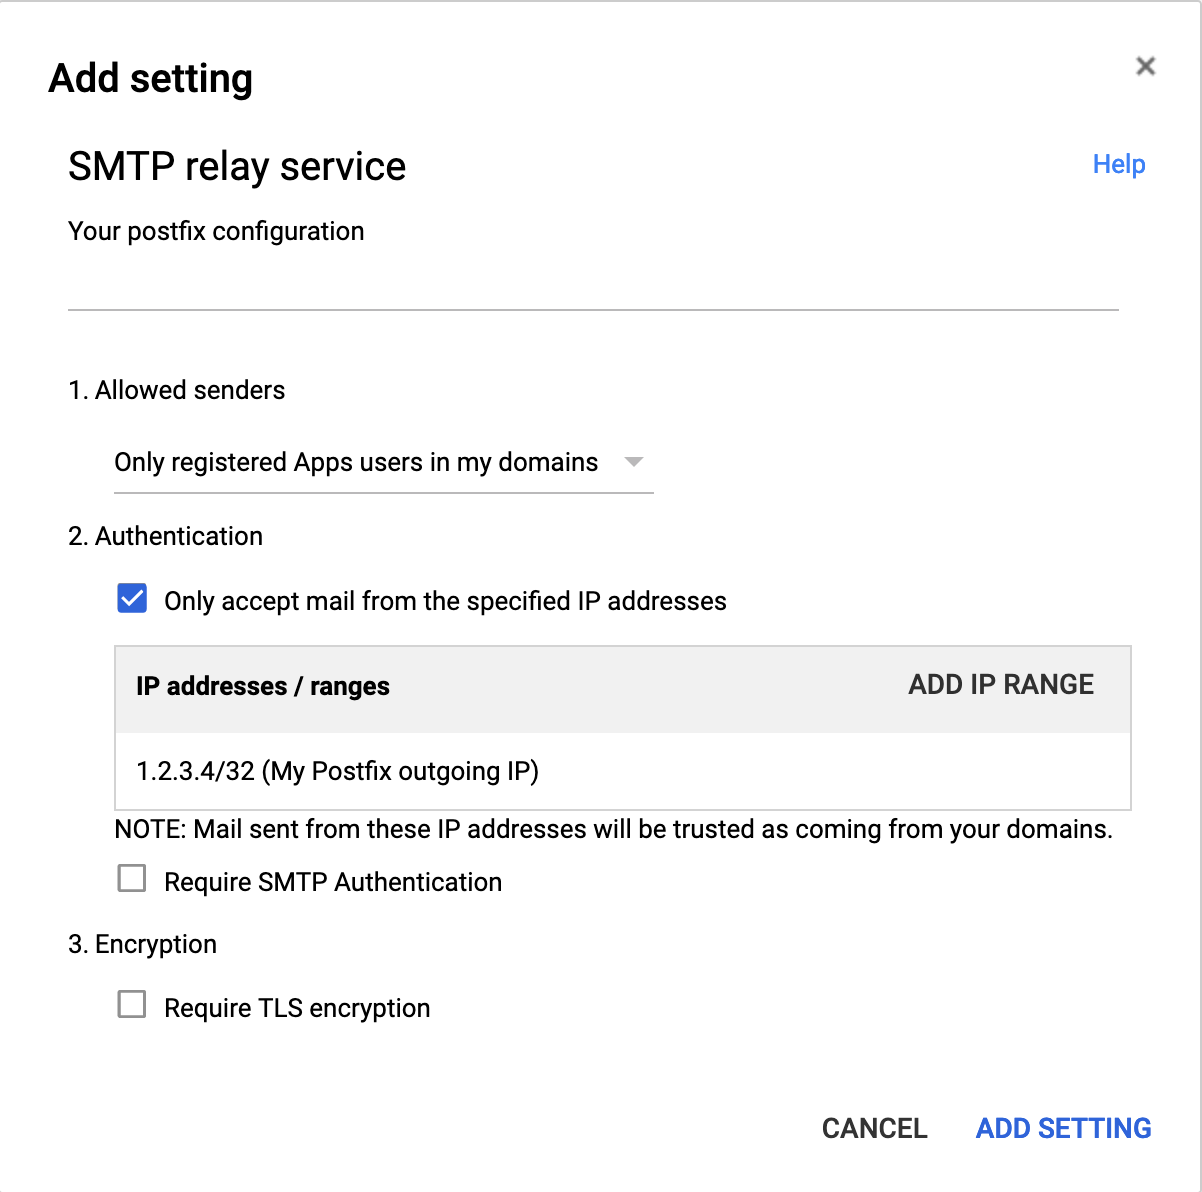
Relaying messages through Google Apps account
Google Apps allows third-party services to use Google's SMTP servers without much hassle. If you have a static IP, you can configure Gmail to accept your messages. You can then send email from any address within your domain.
You need to enable the SMTP relay service:
- Go to Google Admin /Apps / G Suite / Gmail /Advanced settings.
- Find the Routing / SMTP relay service
- Click Add another button that pops up when you hover over the line
- Enter the name and your server's external IP as shown in the picture below:
- Allowed senders: Only registered Apps users in my domains
- Select Only accept mail from specified IP Addresses
- Click Add IP RANGE and add your external IP
- Make sure Require SMTP Authentication is NOT selected
- You may select Require TLS encryption
Your configuration would be as follows:
RELAYHOST=smtp-relay.gmail.com:587
ALLOWED_SENDER_DOMAINS=<your-domain>
There's no need to configure DKIM or SPF, as Gmail will add these headers automatically.
Relaying messages through Amazon's SES
If your application runs in Amazon Elastic Compute Cloud (Amazon EC2), you can use Amazon SES to send 62,000 emails
every month at no additional charge. You'll need an AWS account and SMTP credentials. The SMTP settings are available
on the SES page. For example, for eu-central-1:
- the SES page is available here
- create the user/credentials. Make sure you write them down, as you will only see them once.
By default, messages that you send through Amazon SES use a subdomain of amazonses.com as the MAIL FROM domain. See Amazon's documentation on how the domain can be configured.
Your configuration would be as follows (example data):
RELAYHOST=email-smtp.eu-central-1.amazonaws.com:587
RELAY_USERNAME=AKIAGHEVSQTOOSQBCSWQ
RELAY_PASSWORD=BK+kjsdfliWELIhEFnlkjf/jwlfkEFN/kDj89Ufj/AAc
ALLOWED_SENDER_DOMAINS=<your-domain>
You will need to configure DKIM and SPF for your domain.
Sending messages directly
If you're sending messages directly, you'll need to:
- need to have a fixed IP address;
- configure a reverse PTR record;
- configure SPF and/or DKIM as explained in this document;
- it's also highly advisable to have your own IP block.
Your configuration would be as follows:
ALLOWED_SENDER_DOMAINS=<your-domain>
Similar projects
There are may other project offering similar functionality. The aim of this project, however, is:
- to make it as simple as possible to run the relay, without going too much into postfix configuration details
- to make the image as small as possible (hence basing on Alpine linux)
- to make the image and the corresponding code testable
The other projects are, in completely random order:
License check
