| back | ||
| gpg | ||
| scripts | ||
| License | ||
| README.md | ||
| README_EN.md | ||
PVE
Thanks to Proxmox VE for the free subscription support
Preface
It is recommended that debian use the latest system as much as possible before using it
Non-debian11 can use debian one-click upgrade to upgrade the system
Of course, it's okay not to use the latest debian system, but it's not officially supported
**Please make sure that the machine can be reinstalled before use, there is no guarantee that this script will not cause any bugs!!! **
**If the server is a VPS and not a solo service, there may be various bugs, please be ready to reinstall the server if the deployment fails!!!! **
Configuration and system requirements
Only Debian system (non-Debian can not be installed through the APT source, the official only gave the image of Debian, other systems can only use ISO installation)
System requirements: Debian 8+
Minimum hardware requirements: 2 cores 2G RAM x86_64 architecture server hard disk at least 20G
PS: If the hardware requirements are not met, you can use LXD batch open LXC jump
Hardware requirements to open KVM: VM-X or AMD-V support - (part of the VPS and all unique service support)
Checking hardware environment
- This script must be executed before the execution of this repository script to test the environment, if it does not meet the requirements for the installation of PVE, then the subsequent scripts cannot be used
- Check if the hardware configuration meets the minimum requirements
- Check if the hardware environment can be nested with a virtualized KVM type server
- Check if the system environment can be nested with a virtualized KVM type server
- Non-nestable virtualized KVM type servers can also run LXC virtualized servers
bash <(wget -qO- --no-check-certificate https://raw.githubusercontent.com/spiritLHLS/pve/main/scripts/check_kernal.sh)
PVE base installation (one-click PVE installation)
- The installation is the latest PVE for the current apt source
- For example, debian10 is pve6.4, debian11 is pve7.x
- Modified /etc/hosts file (fixed incorrectly set merchant hostname and added required content for PVE)
- Set
chattr -i /etc/hoststo read-only mode to avoid overwriting the file after reboot, if you want to modify it, please usechattr -i /etc/hoststo cancel the read-only lock, after modification, please executechattr +i /etc/hoststo read-only lock - Check if it is Chinese IP, if it is Chinese IP use Tsinghua mirror source, otherwise use official source
- Install the necessary toolkit needed for PVE to open the virtual machine
- Replace the enterprise subscription in the apt source with the community source
- Print query if Linux kernel and PVE kernel are installed
- Check if the network configuration is a dhcp configured V4 network, if so convert to static address to avoid dhcp failure after reboot, has been set to read-only mode, if you need to modify please use
chattr -i /etc/network/interfaces.d/50-cloud-initto cancel the read-only lock, after modification please execute - Check if
/etc/resolv.confis empty, if it is, set the systemd service to detect8.8.8.8's boot up and add DNS - After adding the APT source link for PVE, download PVE and print out the login information
- After configuration, you need to reboot the system to load the new kernel
curl -L https://raw.githubusercontent.com/spiritLHLS/pve/main/scripts/scripts/install_pve.sh -o install_pve.sh && chmod +x install_pve.sh && bash install_pve.sh
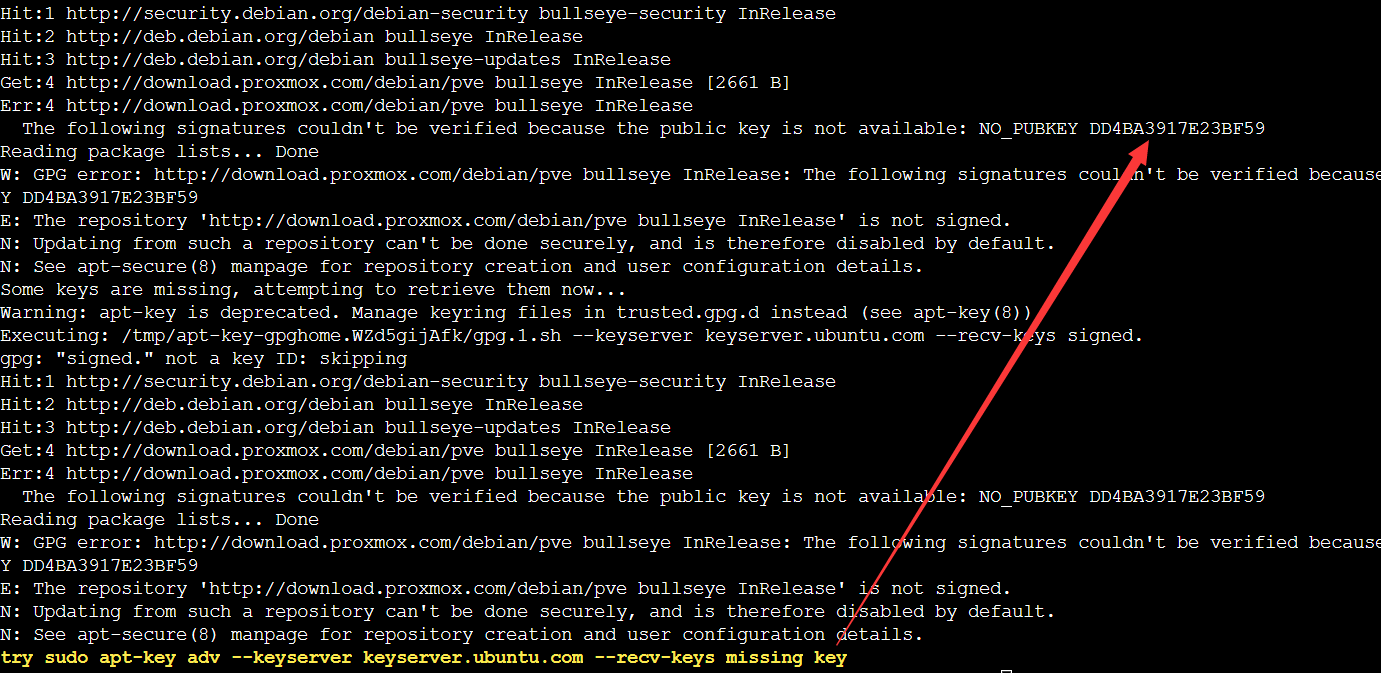
- The installation process may exit the installation, you need to repair the apt source manually, as shown in the following figure after the repair is completed, execute this script again

Pre-configured environment
- Create resource pool mypool
- Remove subscription pop-ups
- Attempt to enable hardware passthrough
- Detect AppArmor module and attempt to install
bash <(wget -qO- --no-check-certificate https://raw.githubusercontent.com/spiritLHLS/pve/main/scripts/build_backend.sh)
Auto-configure NAT gateway for IPV4
- Please ensure that the server has been restarted and PVE is working properly on the WEB side before using it
- Create vmbr0
- Create vmbr1 (NAT gateway)
- Use
172.16.1.1for the gateway (IPV4) and172.16.1.x/24for IPV4/CIDR when opening the NAT virtual machine, the x here cannot be 1 - You may need to manually click the web side to apply the configuration button to apply a
- To see the complete settings, you can execute
cat /etc/network/interfacesto see - Load iptables and set back to source and allow NAT port forwarding
bash <(wget -qO- --no-check-certificate https://raw.githubusercontent.com/spiritLHLS/pve/main/scripts/build_nat_network.sh)
Generate a NAT server for KVM virtualization with one click
Remember to execute the first command in this repository before using it, the one that detects the hardware environment, as shown below

To query the above, just use the following one-click script to create the virtual machine automatically, no need to manually modify the WEB-side settings again

Query as above after using the subsequent script to create a virtual machine, you need to manually modify the WEB side settings, you need to turn off the hardware nested virtualization corresponding to each virtual machine, as follows
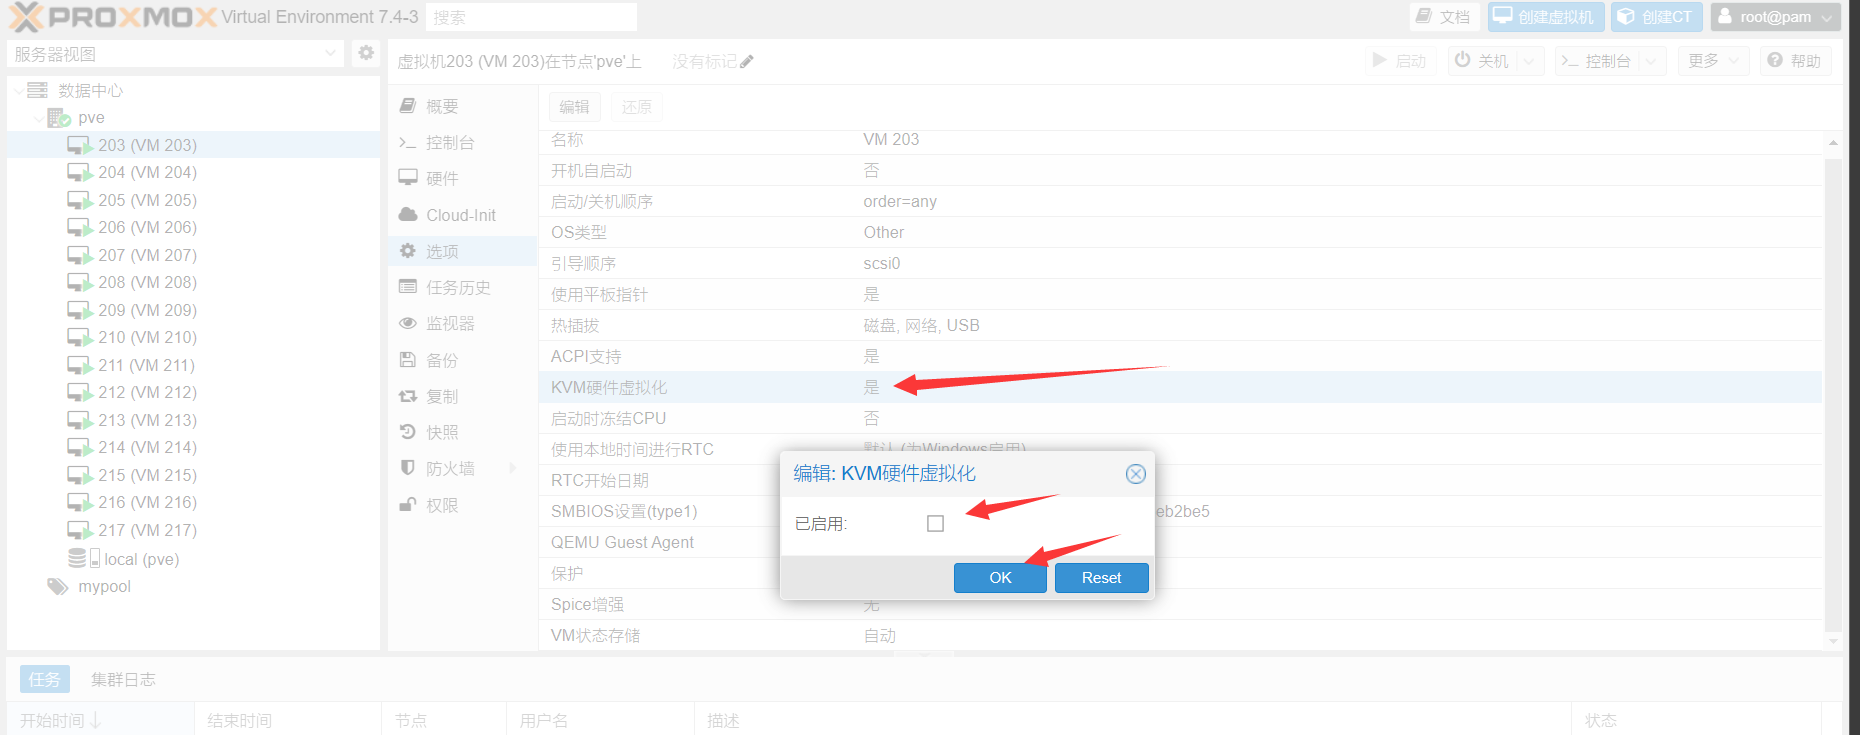
First stop the virtual machine and then modify it, and then turn it on after modifying it in order to use NOVNC, not closing it may cause this virtual machine to have bugs that can't be used
Generate separate VMs for KVM virtualization
- Automatically open a NAT server, the default is to use the Debian10 image, because it takes up the least amount of space.
- can be customized in the command need to use the mirror, here are given a good configuration of the mirror, the mirror comes with space is 2G hard disk, so at least need to set the hard disk to 3G in the command
- custom memory size recommended 512MB memory, it should be noted that the mother hen memory remember to open some swap to avoid machine bombing open SWAP point me to jump
- Automatic internal and external network port mapping, including 22, 80, 443 ports and other 25 internal and external network port number the same port
- After generation, you need to wait for a period of time to configure the network and login information by cloudinit inside the virtual machine, it takes about 5 minutes
curl -L https://raw.githubusercontent.com/spiritLHLS/pve/main/scripts/buildvm.sh -o buildvm.sh && chmod +x buildvm.sh
How to use
- System support: See the systems listed in Jump for details, when using just write the file name, no need for the .qcow2 suffix
- Note that the username here can not be a pure number, it will cause problems with cloudinit, it is best to start with plain English or English
./buildvm.sh VMID UserName Password CPU Cores Memory HardDisk SSHPort 80Port 443Port ExtranetPortStart ExtranetPortStop System
Example
Test opening a NAT server
The following example opens a virtual machine with VMID 102, username test1, password 1234567, CPU 1 core, memory 512MB, hard disk 5G, SSH port 40001, port 80 40002, port 443 40003.
Meanwhile, the internal and external network mapping ports are in the same range of 50000 to 50025, and the system is using ubuntu20
./buildvm.sh 102 test1 1234567 1 512 5 40001 40002 40003 50000 50025 ubuntu20
Executable after opening
cat vm102
View Information
Deletion Example
- Delete port mapping delete test machine
qm stop 102
qm destroy 102
iptables -t nat -F
iptables -t filter -F
service networking restart
systemctl restart networking.service
rm -rf vm102
Related qcow2 mirrors
- Pre-installed to open cloudinit, open SSH login, preset value SSH listening to V4 and V6 port 22, open to allow password authentication login, open to allow ROOT login
https://github.com/spiritLHLS/Images/releases/tag/v1.0
Batch opening of KVM virtualized VMs for NAT
- You need to ensure that there is no virtual machine without any port mapping before using PVE for the first time, otherwise there may be bugs
- Please use screen to suspend the execution before opening to avoid batch running SSH instability which leads to interruption in the middle of execution
- You can run the batch generation VM multiple times, but you need to pay attention to the hen memory remember to open some swap to avoid machine bombing open SWAP point me to jump
- automatically open NAT server, the default use of Debian10 image, because the image occupies the smallest
- Automatic internal and external network port mapping, including 22, 80, 443 ports and other 25 internal and external network port number the same port
- After generation, you need to wait for a while for cloudinit inside the virtual machine to configure the network and login information, which takes about 5 minutes.
- The default network configuration of the batch virtual machine is: 22, 80, 443 ports and a 25-port internal and external network mapping
- You can customize the number of cores, memory size and hard disk size for batch opening, remember to calculate the free resources for opening
curl -L https://raw.githubusercontent.com/spiritLHLS/pve/main/scripts/create_vm.sh -o create_vm.sh && chmod +x create_vm.sh && bash create_vm.sh
Executable after running
cat vmlog
View Information
Delete all virtual machines
for vmid in $(qm list | awk '{if(NR>1) print $1}'); do qm stop $vmid; qm destroy $vmid; rm -rf /var/lib/vz/images/$vmid*; done
iptables -t nat -F
iptables -t filter -F
service networking restart
systemctl restart networking.service
rm -rf vmlog
Cautions
PVE modify the configuration of the virtual machine before you have to stop first, then modify the configuration, modify and then start, so as not to have a configuration reload error
Acknowledgements
https://blog.ilolicon.com/archives/615
https://github.com/Ella-Alinda/somescripts/blob/main/nat.sh
https://pve.proxmox.com/pve-docs/qm.1.html
https://down.idc.wiki/Image/realServer-Template/
https://mirrors.tuna.tsinghua.edu.cn/proxmox/
https://github.com/roacn/pve/blob/main/pve.sh
Thanks to @Ella-Alinda for the PVE guide
Friendly Links
VPS Fusion Monster Measurement Script